Top Dog Die Guest Designer

Hi everyone! I’m so excited and honored to be a guest designer for Top Dog Dies this week. This release has so many cute dies, great for summer projects!

My first project is a card using the adorable crab from the NEW Underwater Life set.  Isn’t he just the cutest? I had to put googly eyes on him because I couldn’t picture him any other way.

image

All of my images were colored using various Tim Holtz Distress inks. To add interest to the wavy background, I used two of the dies from the new Water Die Set and inked them with different shades of blue. I just love how fun it looks. I added the adorable sentiment with some twine and the circle from the Mini Tag dies set.

image

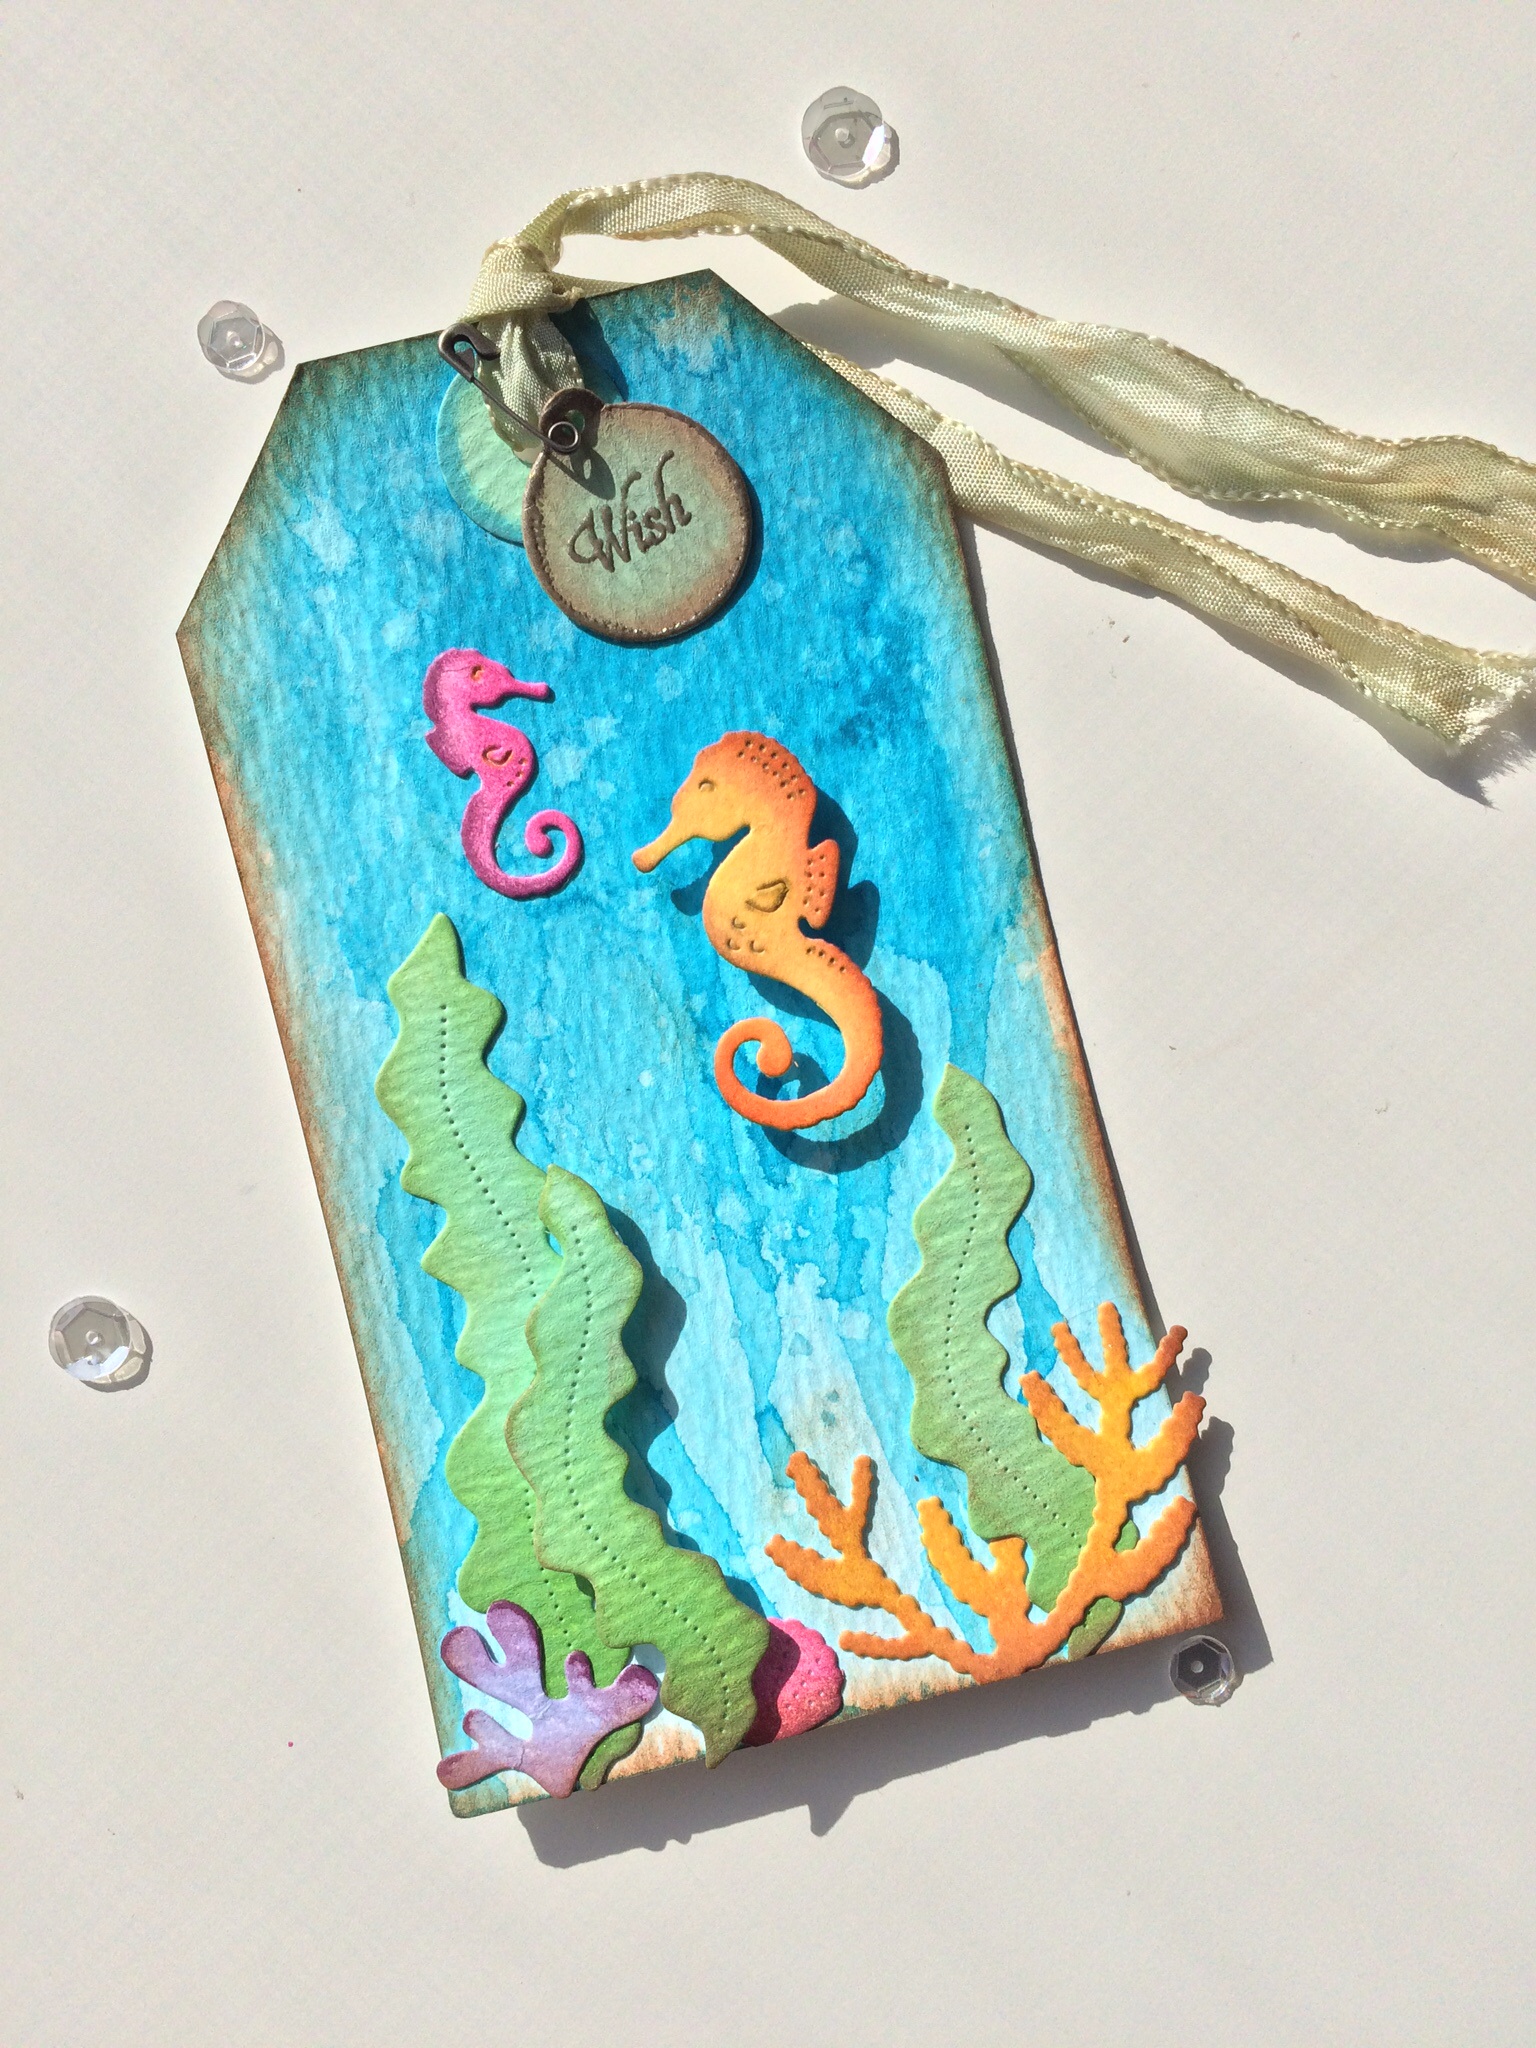
I also created a tag using the Underwater Life set. It’s so much fun to color the little sea critters with any color you fancy, the possibilities are limitless! I used Distress markers to emphasize the tiny details on the images created by the die.

image

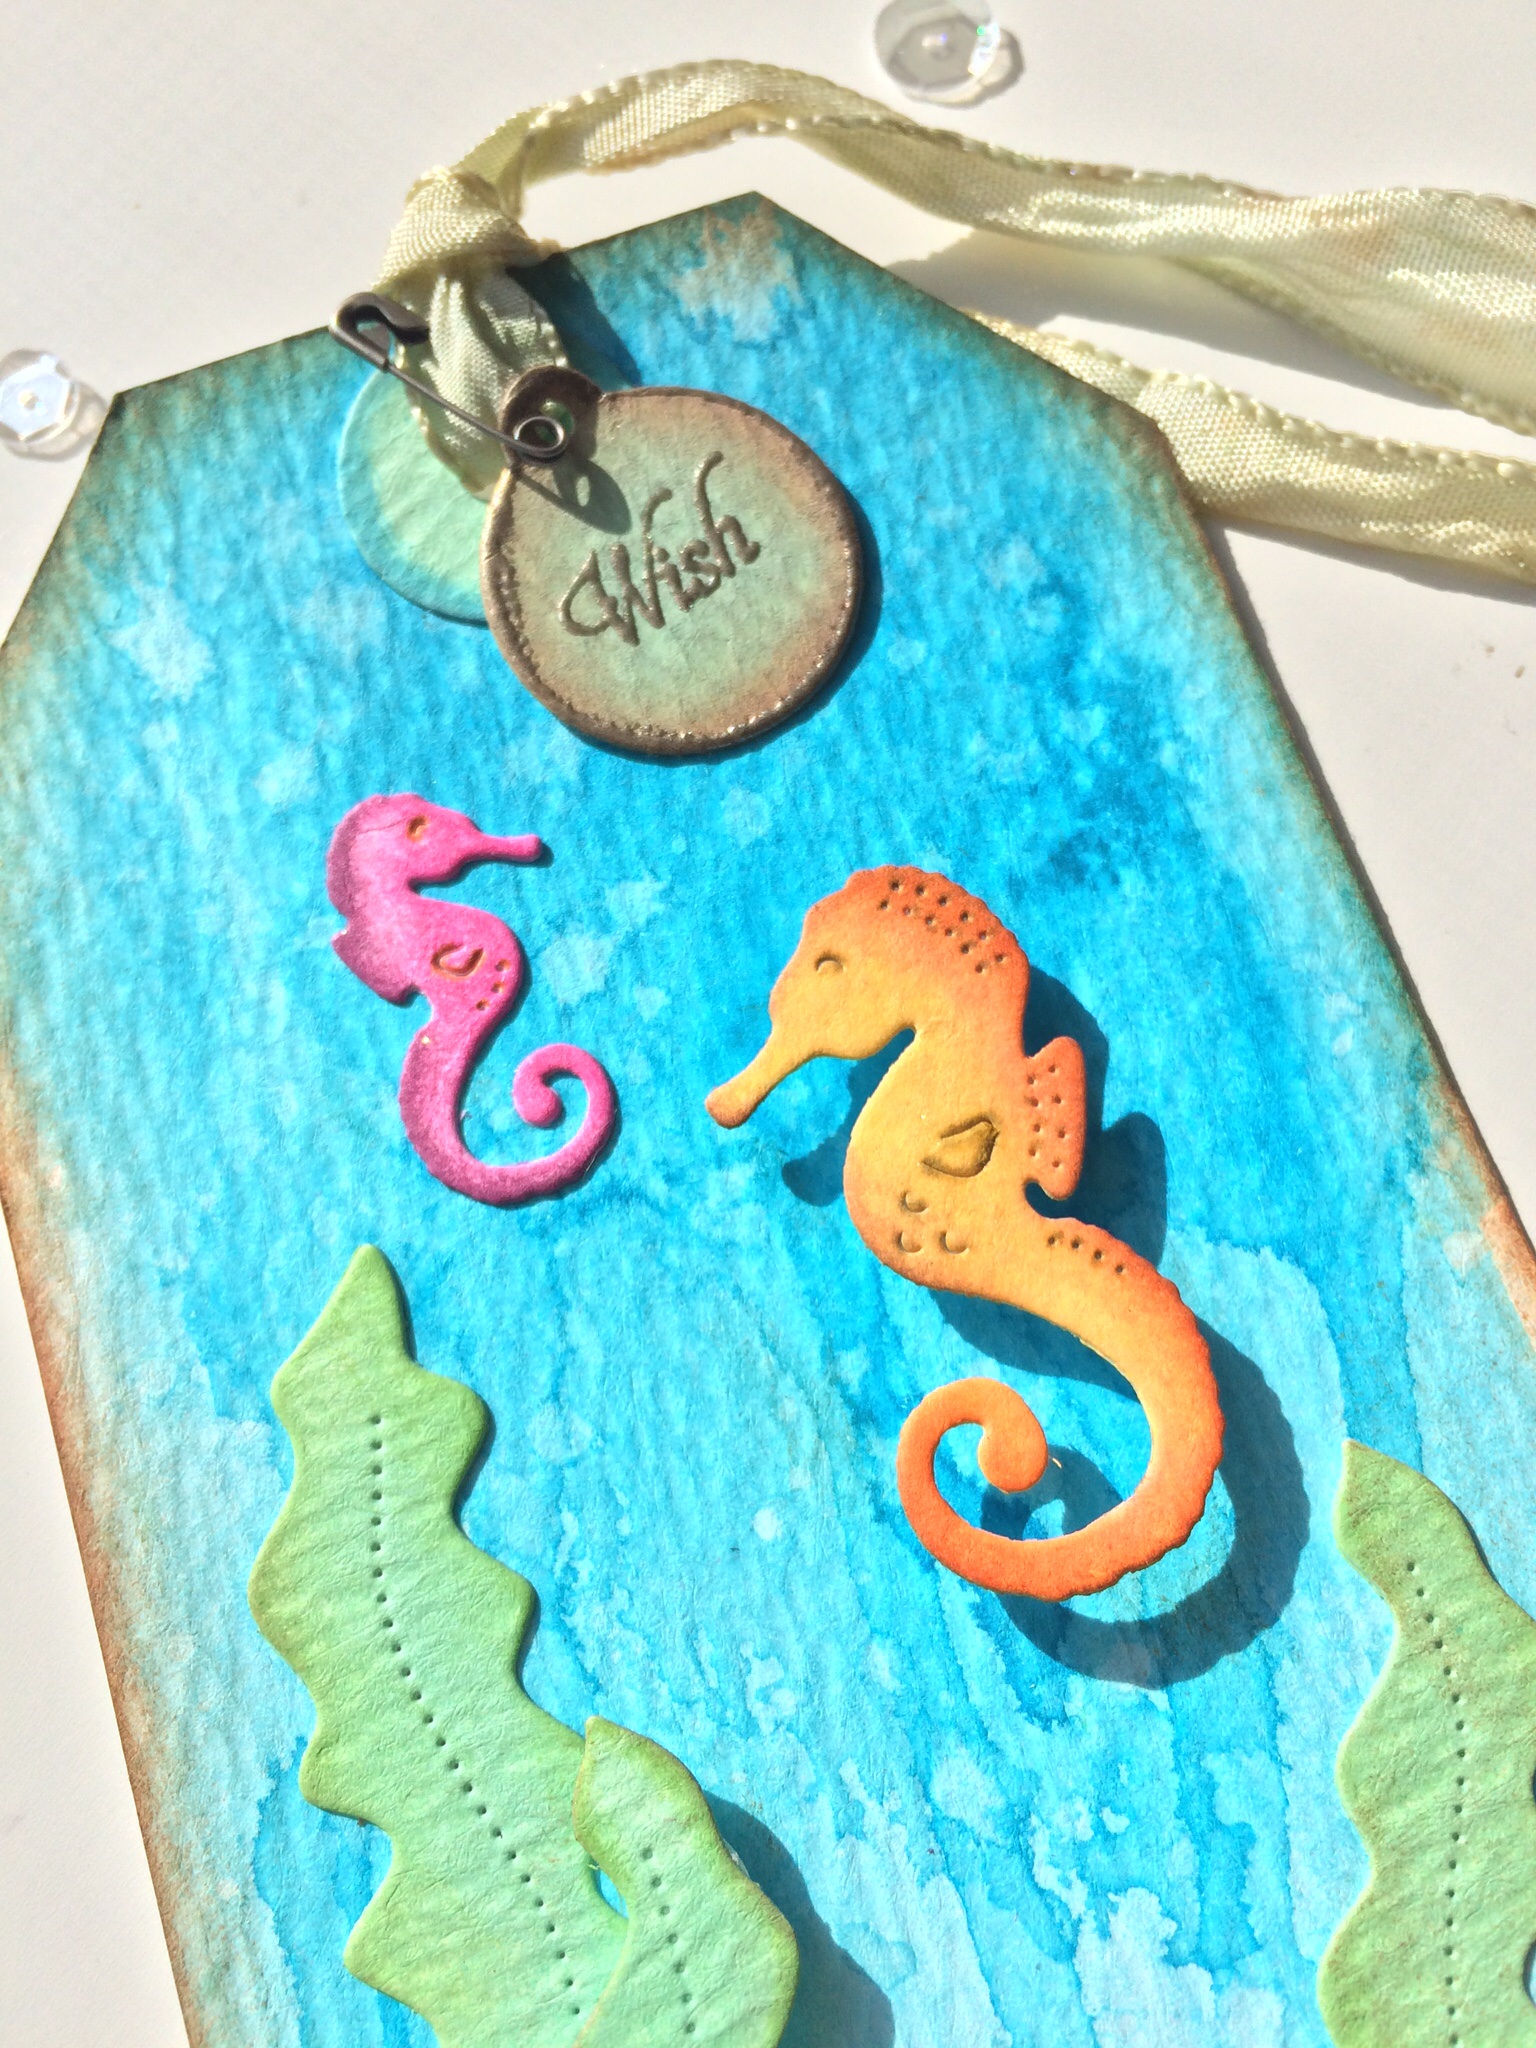
I also die cut a little circle tag using the Mini Tags set to create a faux metal charm. A little Distress ink on the edges finishes off the vintage look.

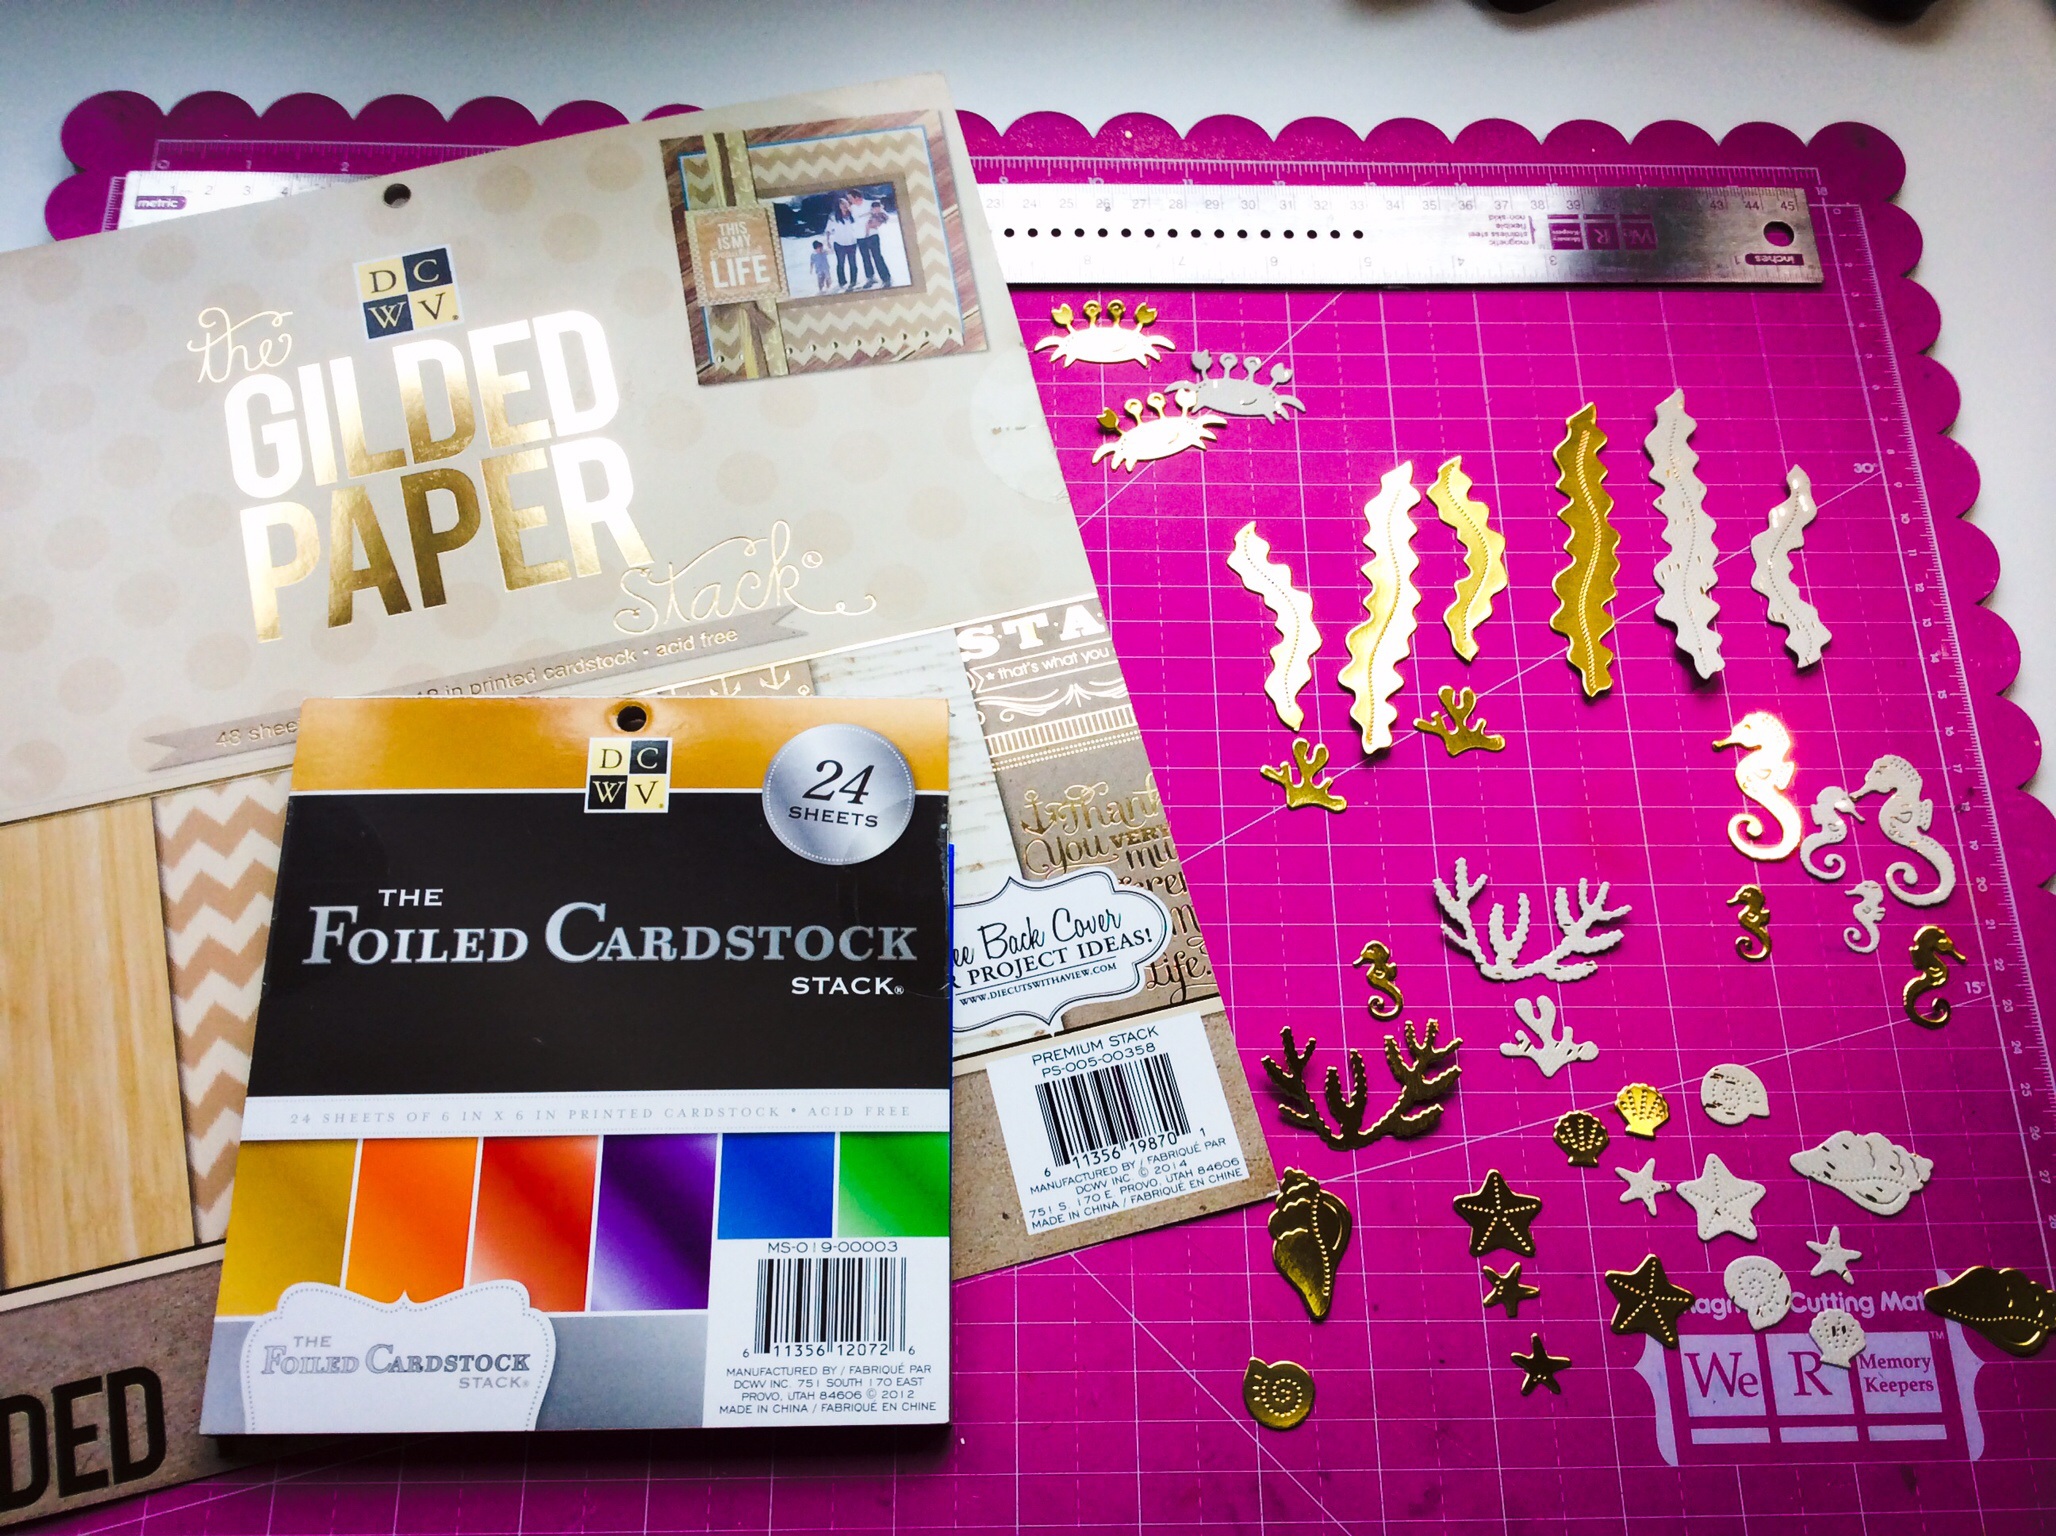
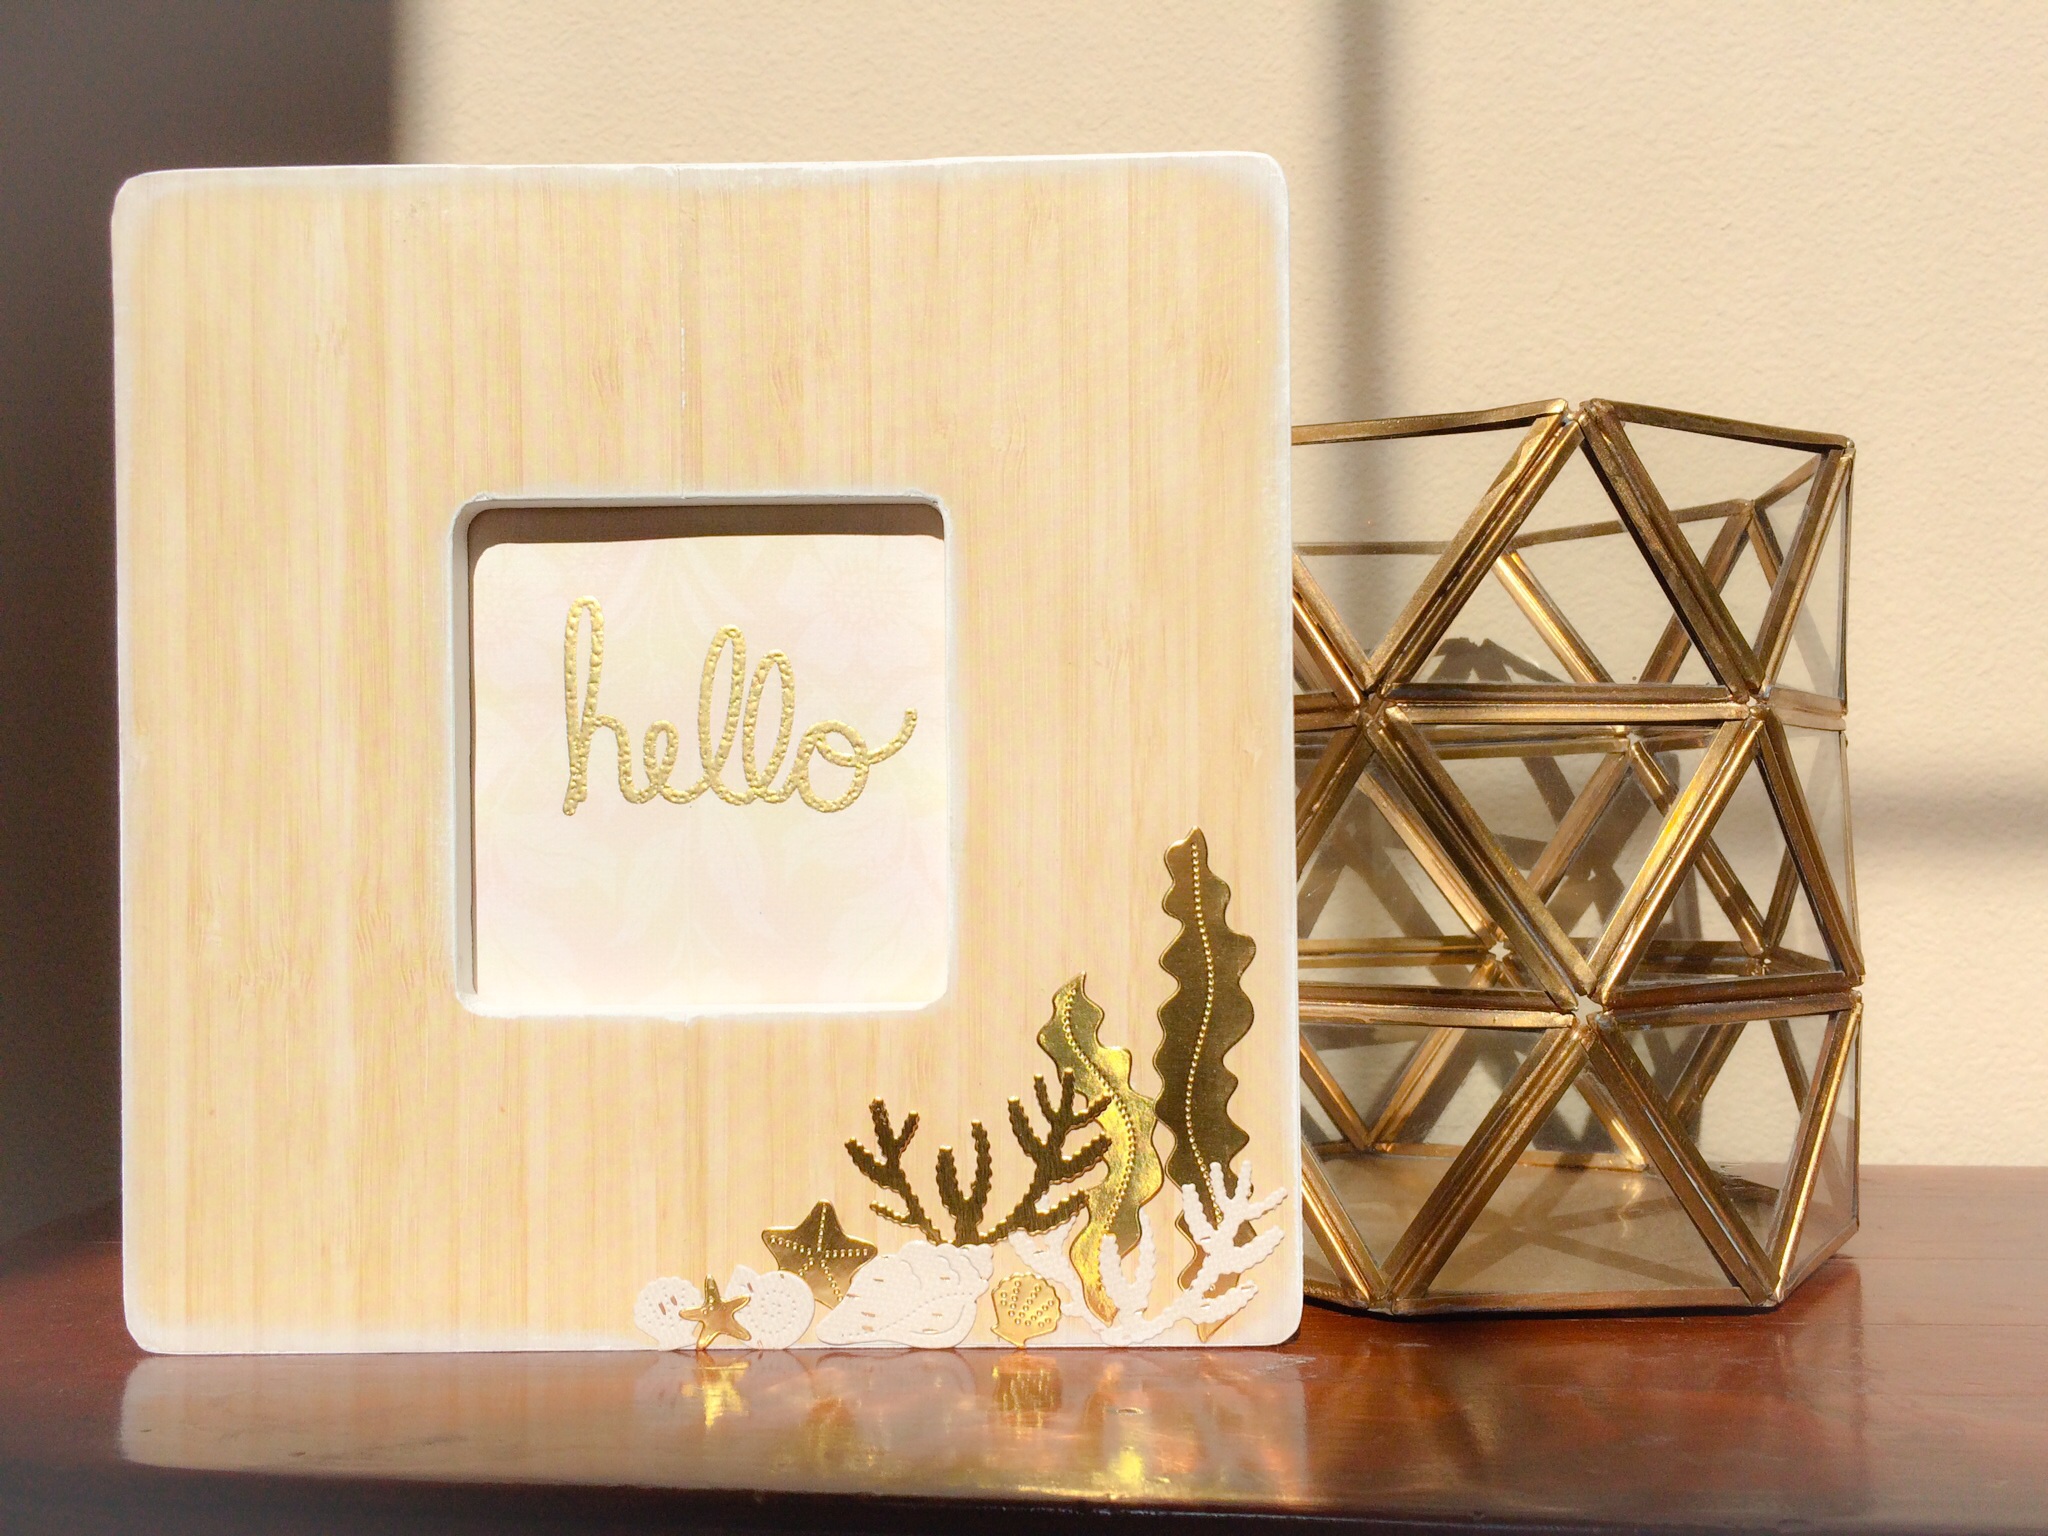
I’ve always wanted to alter a picture frame and when I saw the new Underwater Life die set, I knew I had to use them! I searched high and low for the perfect wooden frame. I couldn’t find anything I had in mind until I scoured my paper stash. Why not, right? So I used an amazing paper stack by DCWV.

image

Step 1. Cut your paper to fit each side of your project and adhere with liquid adhesive. It doesn’t need to be perfect, because next we will sand and ink the edges to give the frame a finished look.

image

Step 2. Die cut the shapes out of your desired material. Here, I chose gold foil card stock and a neutral beige from the  Gilded Stack.

Step 3. Arrange the shapes on your frame and adhere.

Step 4. Choose a family photo or inspirational quote to add to the inside if your frame.

image

It was so much fun creating something that I love and am proud to display in my home using these awesome dies. Thanks for stopping by, and check out all of the great products from Top Dog Dies new summer release. You can also visit the amazing Top Dog Dies Blog for more inspirational projects by the Top Dog Design Team.

SSS May 2015 kit Anniversary card

Hello crafty peeps! Just popping by with a quick card I made for my In-Law’s anniversary this week. Happy Anniversary Diane and Bryan! :)

This card features the Simon Says Stamp May 2105 Card kit. I hoped to be able to use more of the kit, but just ended up using the gorgeous patterned papers included, by Fancy Pants. SO PRETTY!

image

This month’s kit comes with an exclusive SSS Pale Blush full sized ink pad. I have to say, they have really stepped up their game and I absolutely love these kits. The full pack of sticker sheets are also from Fancy Pants and have tons of gold foiling.

image

For this card, I picked out a couple of papers to work with which helped me choose my color palette (pale pink, white, black and gold accents). I cut out a vellum doily using a Papertrey ink die for a layered look. The Happy word die is a Heidi Swapp die that I just can’t stop using! You can’t tell in the photos, but I added Wink of Stella to it for some extra shimmer.

image

This was a fun and simple card to make. I think what made it so easy was how well all of the products in the kit coordinated. That’s it for today, thanks for stopping by! HAPPY CRAFTING.

For more of what I’m working on and buying, check out my YouTube channel! THANKS again:)

April 2015 Simon Says Stamp Card kit

Hi guys! Today I’m here to share a card that I have made with the amazing April 2015 card kit from Simon Says Stamp. I’m so in love with this kit! It’s amazing.. Beautiful gold rub-ons, Washi, paper and more!

image

I have a monthly subscription for $24.95 +shipping. If you don’t want to subscribe they have it available for purchase on its own for $29.95+shipping on Simon Says Stamp’s website. Believe me though… The subscription is TOTALLY worth it! Here is my card.

image

I’m in love with the Washi tape included in the kit from Pink Fresh Studio. It’s available to buy in different colors but the kit came with this beautiful ombré from mint to peach with gold stripes…. STUNNING! I applied 3 or 4 strips of the Washi to some white cardstock making sure to line up the gold stripes. Then I ran the piece through my die cut machine with a Happy Die from Papertrey Ink.

image

I really love how it turned out. I’m going to use this technique a lot more to get more use out of the Washi I have been hoarding:) I added some enamel dots and a gold star brad included in the kit.

image

I had a lot of fun creating with these products…. I’m gonna make some more cards with this kit. Hopefully I have luck with the rub-ons. I tried some Heidi Swapp rub-ons recently and it didn’t go so well.

image

Thanks for stopping by my blog today! Have a great day and HAPPY CRAFTING!:)

Beep Boop Birthday

Hi there! I’m here to share a birthday card featuring Lawn Fawn stamps and dies.

image

I used the new Scripty Sayings stamp set to create the background using various inks (mostly Papertrey Ink). Then, I Copic colored one of the cute little robots from the  Beep Boop Birthday stamp set.

image

I die cut a circle from the front panel and used Peacock Feathers Distress ink to create a subtle background behind this cheery bot.

I think I have finally found my style in card making to be Clean and Simple with the occasional Distress ink messy goodness:).

Well that’s all for today, thanks for stopping by and Happy Crafting!